CTGU自动打卡
CTGU自动打卡
NihilCTGU自动安全上报
项目名称:CTGU自动安全上报
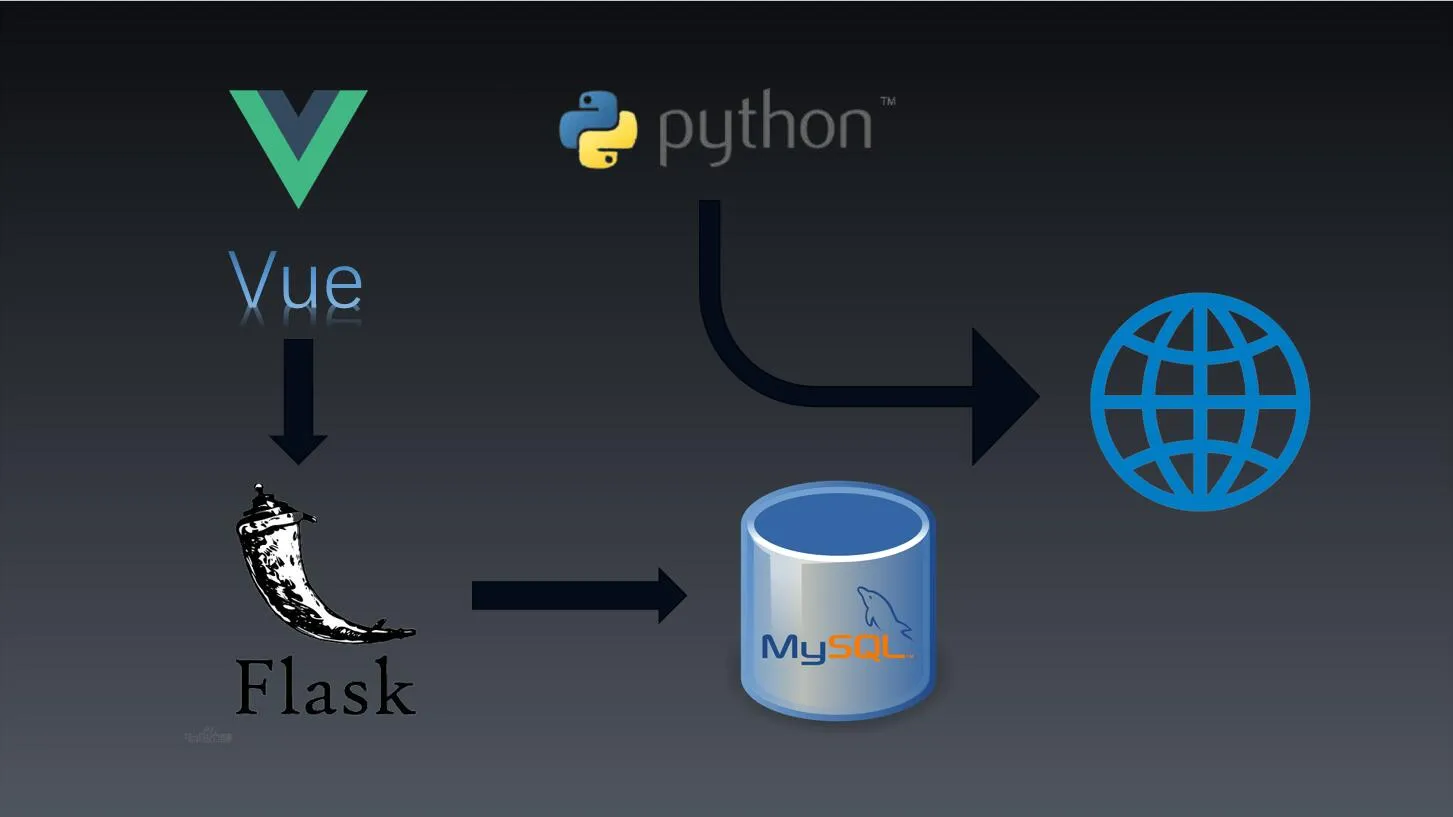
所使用技术栈:Vue2 + Flask + MySQL
实现过程:用户通过提交表单数据到Flask提供的API接口,将学号密码存储到MySQL数据库中,再通过服务器端Python脚本每天调用数据库参数对CTGU安全上报接口进行请求,达到自动安全上报。
源码地址:Alexation/Yiqing: CTGU Auto Safety Report (github.com)
实现过程大致分为三个阶段:
- 自动安全上报脚本编写
- 前端用户信息收集
- 后端提供API接口
自动安全上报脚本编写
Python脚本构造思路
1.明确需求(Website)
2.发送请求(Request)
- 请求方式:Get、Post
- 请求URL:URL全称统一资源定位符,如一个网页文档、一张图片、一个视频等都可以用URL唯一来确定
- 请求头:头部信息如User-Agent、Host、Cookies等信息
- 请求体:请求时额外携带的数据,如表单提交时的表单数据
3.获取数据(Response)
- 响应状态:有多种响应状态,如200代表成果、301跳转、404找不到页面、502服务器错误等
- 响应头:如内容类型、内容长度、服务器信息、设置Cookie等
- 响应体:最主要的部分、包含了请求资源的内容,如网页的HTML、图片的二进制数据等
4.解析数据(Parse)
- 直接处理
- Json解析
- 正则表达式
- BeautifulSoup
- Parsel
- Xpath/CSS
5.存储数据(Database)
- 文本:如纯文本、Json、Xml等
- 关系型数据库:如MySQL、Orcacle、SQL Server等
- 非关系型数据库:如MongoDB、Redis等key-value形式储存
- 二进制文件:如图片、视频、音频等直接保存成特定文件格式
根据网页结构编写代码
来到登录页面按下F12并刷新网页,因为登录涉及跳转甚至重定向,因此要勾选Preserve log选项。

实际抓包过程中,我们发现登录的Post请求并没有返回相应的关键字段,但是我们发现cookie字段中含有JSESSION便可推断当我们访问登录页面时,服务器返回JSESSION,之后通过我们登陆时的JSESSION对相应的账户进行匹配,于是我们可以直接构造Session对象维持会话。

# Origin Headers
headers = {
    'Host': 'yiqing.ctgu.edu.cn',
    'Referer': 'http://yiqing.ctgu.edu.cn/wx/index/main.do?currSchool=ctgu&CURRENT_YEAR=2019&showWjdc=false&studentShowWjdc=false',
    # 'Upgrade-Insecure-Requests': '1',
    'User-Agent': 'Mozilla/5.0 (Windows NT 10.0; Win64; x64) AppleWebKit/537.36 (KHTML, like Gecko) Chrome/97.0.4692.99 Safari/537.36',
}

# 获取服务器端 JSESSIONID
session = requests.Session()
session_url = 'http://yiqing.ctgu.edu.cn/wx/health/main.do'
response_session = session.get(url=session_url, headers=headers, allow_redirects=False)

# post data
data = {
    'username': username,
    'password': password,
}

# 模拟登录请求,进行 JSESSIONID 账号配对
login_url = 'http://yiqing.ctgu.edu.cn/wx/index/loginSubmit.do'
response_data = session.post(url=login_url, data=data).text
print('登录状态: ' + response_data)
登录成功返回success,失败返回false。后续我们可以通过该接口返回值对有效用户进行筛选。接下来我们利用该session请求提交页面拿到隐藏的token

# Get token
apply_url = 'http://yiqing.ctgu.edu.cn/wx/health/toApply.do'
apply_response = session.get(url=apply_url).text

# 判断是否已提交请求,如果已经提交的话服务器便不再响应
if re.findall('<input type="hidden" name="ttoken" value="(.*?)"/>', apply_response):
token = re.findall('<input type="hidden" name="ttoken" value="(.*?)"/>', apply_response)[0]

# 获取上一次提交数据进行构造请求
before_url = 'http://yiqing.ctgu.edu.cn/wx/health/studentHis.do'
before_data = session.post(url=before_url, data=data).text
before_data_json = json.loads(before_data)

# 构造提交参数
data_submit = {
'ttoken': token,
'province': before_data_json[0]['province'],
'city': before_data_json[0]['city'],
'district': before_data_json[0]['district'],
'adcode': before_data_json[0]['adcode'],
'longitude': before_data_json[0]['longitude'],
'latitude': before_data_json[0]['latitude'],
'sfqz': before_data_json[0]['sfqz'],
'sfys': before_data_json[0]['sfys'],
'sfzy': before_data_json[0]['sfzy'],
'sfgl': before_data_json[0]['sfgl'],
'status': before_data_json[0]['status'],
'szdz': before_data_json[0]['szdz'],
'sjh': before_data_json[0]['sjh'],
'lxrxm': before_data_json[0]['lxrxm'],
'lxrsjh': before_data_json[0]['lxrsjh'],
'sffr': before_data_json[0]['sffr'],
'sffrAm': before_data_json[0]['sffrAm'],
'sffrNoon': before_data_json[0]['sffrNoon'],
'sffrPm': before_data_json[0]['sffrPm'],
'sffy': before_data_json[0]['sffy'],
'sfgr': before_data_json[0]['sfgr'],
'qzglsj': before_data_json[0]['qzglsj'],
'qzgldd': before_data_json[0]['qzgldd'],
'glyy': before_data_json[0]['glyy'],
'mqzz': before_data_json[0]['mqzz'],
'sffx': before_data_json[0]['sffx'],
'qt': before_data_json[0]['qt'],
}
找到最后提交的URL进行请求即可

# Final Submit API
url = 'http://yiqing.ctgu.edu.cn/wx/health/saveApply.do'
submit = session.post(url=url, data=data_submit).text
submit_json = json.loads(submit)

print('提交状态:' + submit_json['msgStatus'])
time.sleep(1)
对接MySQL数据库
利用pymysql库将数据库信息拉到本地遍历请求即可
try:
    # Connect MySQL
    connection = pymysql.connect(host='IP地址', user='数据库用户', passwd='数据库密码', port=3306, db='数据库名称', charset='utf8')
    cursor = connection.cursor()

    # Get user and password
    cursor.execute('select * from yiqing')

    # 收集所有用户信息
    user_information = cursor.fetchall()

    # Disconnect MySQL
    connection.commit()
    cursor.close()
    connection.close()
except:
    ErrorLog('Error---MySQL')
后端提供API接口
利用Flask搭建接口
Flask本身不限定数据库的选择,你可以选择SQL或NOSQL的任何一种。也可以选择更方便的SQLALchemy,类似于Django的ORM。SQLALchemy实际上是对数据库的抽象,让开发者不用直接和SQL语句打交道,而是通过Python对象来操作数据库,在舍弃一些性能开销的同时,换来的是开发效率的较大提升。
SQLAlchemy是一个关系型数据库框架,它提供了高层的ORM和底层的原生数据库的操作。Flask-SQLAlchemy是一个简化了SQLAlchemy操作的flask扩展。
新建api.py文件
from flask import Flask, render_template
from flask_sqlalchemy import SQLAlchemy

app = Flask(__name__, static_url_path='/', static_folder='./../../flask-dist', template_folder='./../../flask-dist')

app.config['SQLALCHEMY_DATABASE_URI'] = 'mysql+pymysql://name:pwd@106.13.174.205:3306/mls_web'
# mysql+pymysql 这是声明数据库和链接数据库的引擎
# name pwd 就是可以访问数据库的用户名密码
# 106.13.174.205:3306 是数据库地址
# /mls_web 这是数据库名字

app.config['SQLALCHEMY_TRACK_MODIFICATIONS'] = True
 如果设置成 True (默认情况),Flask-SQLAlchemy 将会追踪对象的修改并且发送信号。这需要额外的内存, 如果不必要的可以禁用它。

db = SQLAlchemy(app)
声明数据对象

@app.route('/')
def index():
    return render_template('index.html')

if __name__ == '__main__':
    app.run(debug=True)
安装包
pip install sqlacodegencmd 切换到 flask目录 执行
sqlacodegen --outfile=models.py mysql+pymysql://name:pwd@106.13.174.205:3306/mls_web生成一个models.py文件 user表的映射,在该文件中,如果需要json格式传递,在class中添加如下代码
def to_json(self):
       return {
           'id': self.id,
           'name': self.name,
           'pwd': self.pwd
       }
将model.py引入api.py中
from flask import Flask, render_template, jsonify, request
from flask_sqlalchemy import SQLAlchemy
from models import *

app = Flask(__name__, static_url_path='/', static_folder='./../../flask-dist', template_folder='./../../flask-dist')
app.config['SQLALCHEMY_DATABASE_URI'] = 'mysql+pymysql://mls:a838502774@106.13.174.205:3306/mls_web'
app.config['SQLALCHEMY_TRACK_MODIFICATIONS'] = True
app.config['SQLALCHEMY_UCSO'] = True

db = SQLAlchemy(app)

@app.route('/')
def index():
    return render_template('index.html')


@app.route('/getUser', methods=['GET', 'POST'])   # 查询数据的接口
def get_user():
    res = db.session.query(User).all()				#User是从models里导入的
    temp = []
    for x in res:
        temp.append(x.to_json())
    return jsonify(data=temp)


@app.route('/addUser', methods=['POST'])      #新增数据的接口
def add_user():
    data = request.json        #获取传过来的参数
    u = User(name=data.get("name"),pwd=data.get("pwd"))      #根据传过来参数创建一条数据
    db.session.add(u)  #add 是增加数据
    db.session.commit()   #提交了才会到数据库中
    return 'success'


if __name__ == '__main__':
    app.run(debug=True)
Flask解决跨域问题
pip install flask-corsflask-cors 有两种用法,一种为全局使用,一种对指定的路由使用
配置全局路由
from flask import Flask, request
from flask_cors import CORS

app = Flask(__name__)
CORS(app, supports_credentials=True)
配置单行路由
from flask import Flask, request
from flask_cors import cross_origin

app = Flask(__name__)

@app.route('/')
@cross_origin(supports_credentials=True)
def hello():
    name = request.args.get("name", "World")
    return f'Hello, {name}!'
服务器后台挂起
到这里接口已经可以正常访问了,但是当程序退出时无法访问,这里我使用gunicorn将flask挂起到后台
# 安装最新版本的gunicorn
pip install gunicorn
#安装指定版本的gunicorn
pip install gunicorn==19.9.0
#异步模式
pip install gevent==1.4.0
定义常用的配置文件
#!usr/bin/env python
#encoding:utf-8


import os
import gevent.monkey
gevent.monkey.patch_all()
import multiprocessing


#开发环境可以打开,生产环境可以
#debug = True

#用于控制errorlog的信息级别,可以设置为debug、info、warning、error、critical
loglevel = 'debug'

#监听地址+端口
bind = "0.0.0.0:5000"

#定义日志存储
if not os.path.exists('log/'):
    os.makedirs('log/')
pidfile = "log/gunicorn.pid"
#访问日志
accesslog = "log/access.log"
#错误日志
errorlog = "log/debug.log"

#开启后台运行,默认值为False
daemon = True

#启动的进程数,推荐值为:CPU核数*2+1
workers = multiprocessing.cpu_count()*2+1

#指开启的每个工作进程的模式类型,默认为sync模式,也可使用gevent模式
worker_class = 'gevent'
x_forwarded_for_header = 'X-FORWARDED-FOR'
启动方式
# 第一种
gunicorn -w 4 -b 172.19.6.213:5000 api:app
# 第二种
gunicorn --config=config.py api:app
如果出现占用情况,可先查看pid然后关停即可
netstat -tulpn4096即为占位端口的pid
kill -9 4096前端用户信息收集
因为仅仅是收集用户的学号和密码,故不需要router以及vuex等组件,也不需要对axios进行二次封装,所以这里我采用ElementUI的一个表单组件。再通过对样式进行微调,为了放置页面过于单调,为其添加一个SVG的动态背景。
本地调试的时候由于可以通过后端解决跨域问题,便不再对vue.config.js进行更改,不过需要注意的是要在里面更改页面title
// vue.config.js
module.exports = {
  //关闭es6
  lintOnSave: true,
  chainWebpack: config => {
    config
      .plugin('html')
      .tap(args => {
        args[0].title='CTGU自动安全上报'
        return args
      })
  }
}关于ElementUI的按需引入需要在babel.config.js文件里添加配置,包括message也要挂载到vue原型上,这些ElementUI官方文档都有的。
// babel.config.js
module.exports = {
  presets: ['@vue/cli-plugin-babel/preset',["@babel/preset-env", { "modules": false }]],
  plugins: [
    [
      "component",
      {
        "libraryName": "element-ui",
        "styleLibraryName": "theme-chalk"
      }
    ]
  ]
}
向API提交表单,提交的数据格式要和后台接口统一,不然解析后数据可能为空。
// login.vue
// 设置数据格式
const headers = { "Content-Type": "multipart/form-data" };

// 构造表单
let data = new FormData();
data.append("user", this.ruleForm.user);
data.append("password", this.ruleForm.password);

// 发请求
this.$axios
.post("后台数据库地址", data, {
headers: headers,
})
.then(() => {
// console.log(res)
});

// 提交完毕后重置表格,避免重复提交
this.$refs[formName].resetFields();
剩下的就是完善一些细节,比如如何取消自动上报的一些信息以及用户操作完毕后的及时反馈。
// login.vue
mounted() {
    this.$message({
        showClose: true,
        message: "注意:更改密码即可取消自动安全上报",
        type: "info",
    });
},